
- Why isn’t the Learn button in the Pro Tools plugin window responding?

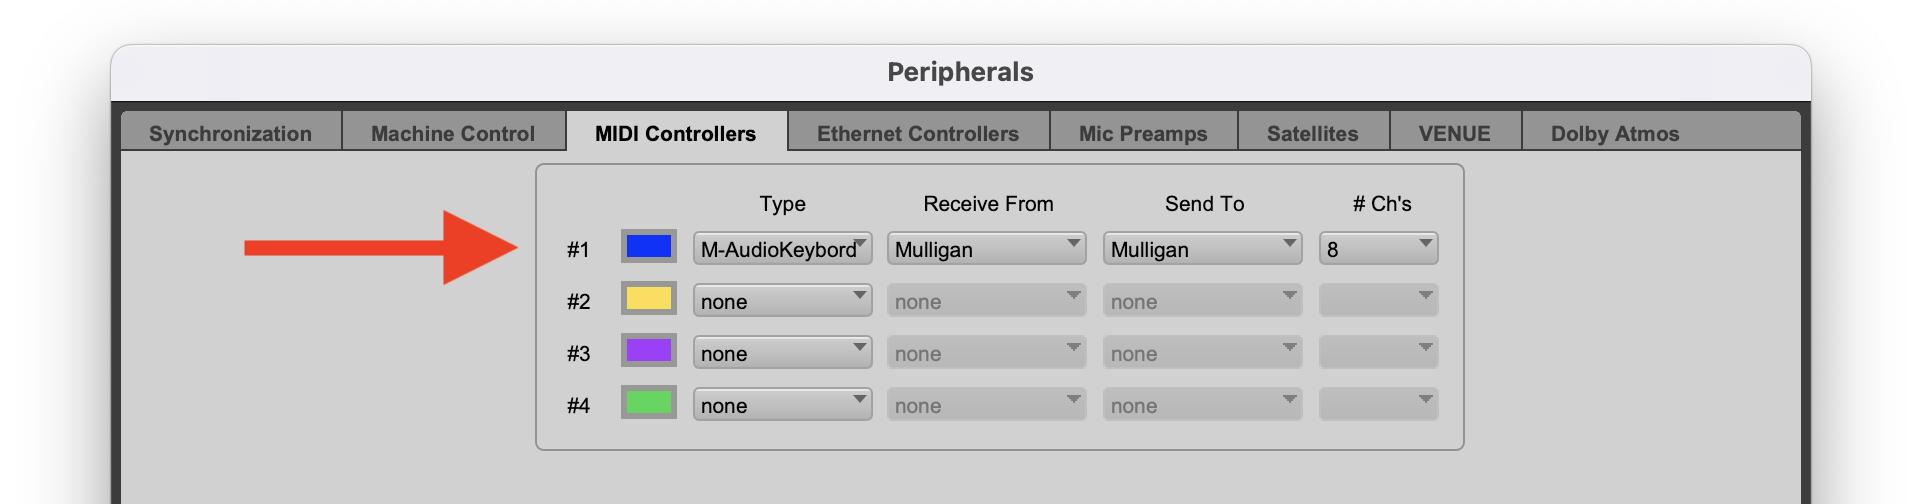
This seems to be a bug in Pro Tools. Unless Mulligan is in slot #1 (in Pro Tools' Setup > Peripherals > MIDI Controllers window), the Learn button at the top of the plugin window does not respond when clicked. Fortunately, there are workarounds for this issue.
Workaround 1
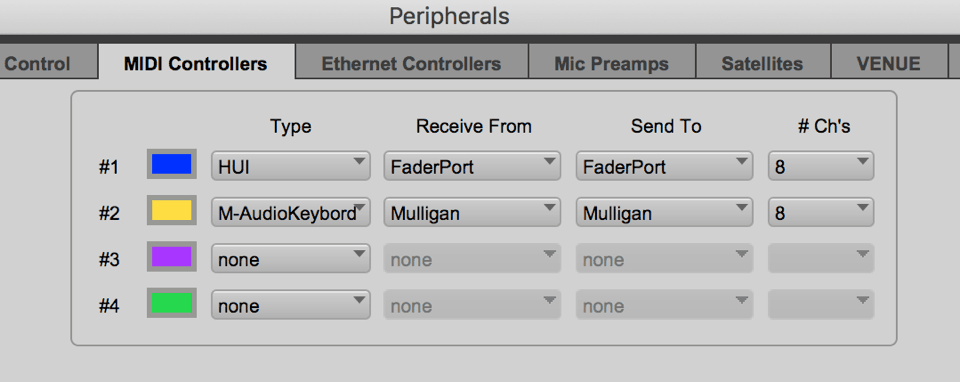
The primary workaround is when setting up Mulligan in Pro Tools' MIDI Controllers window, to make sure that Mulligan is in slot #1.
If you also use another controller that works best when in slot #1 (like a HUI device), then it may make sense to first create custom plugin maps for all the plugins you regularly use, and then move Mulligan to slot #2 for your main workflow.
Workaround 2
There is another workaround for doing custom plugin mapping, even with Mulligan in slot #2, and so without the Learn button working. Using the Map Options menu (the little circle with the down arrow at the top), select New Map:
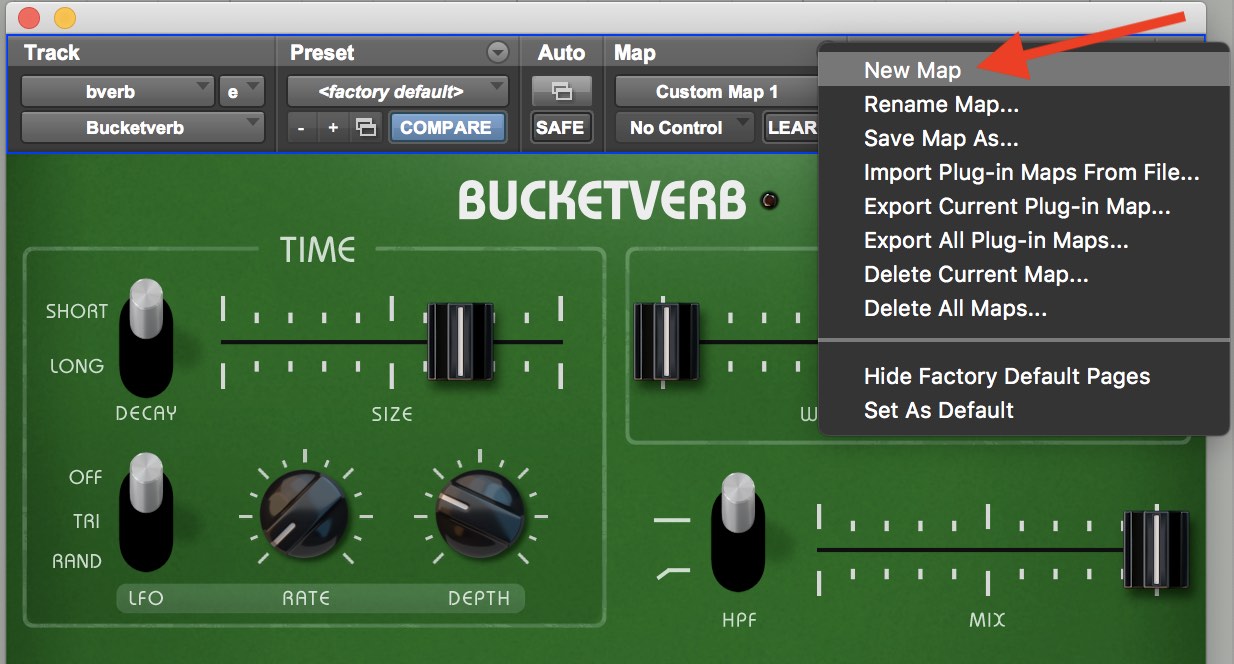
This creates a new custom mapping and puts the plugin into Learn mode automatically. You can assign controls (and if needed, switch parameter pages to make a multi-page map) as normal.
To exit Learn mode, simply click on any other plugin in your session, then click back to the plugin you just created a new mapping for. You won't be able to go back and edit the new mapping at this point (at least, not without enabling the Learn button again by putting Mulligan in peripherals slot #1).
Workaround 3
SoundFlow (which is Mac only) users may find it helpful to install the Mulligan Official SoundFlow package. In addition to extending Mulligan's plugin control functionality, the package includes the command Swap MIDI Controllers 1 and 2, which will switch the controllers between slot #1 and slot #2 at the touch of a button.
- Which MIDI controllers work with Mulligan?
Short answer: All of them!
Long answer: While Mulligan offers universal MIDI compatibility, some hardware controllers will match with Mulligan better than others. Controllers with encoders (aka rotary encoders or endless encoders), which can keep spinning continuously in either direction, offer a better user experience than those with pots (which have a hard stop point at each end of their rotation).
The reason for this is that encoders send what we call Relative data, while pots send Absolute data. With Relative data, it's like the hardware knob automatically matches the position of the onscreen control. But with Absolute data, you might have the hardware control at 9 o'clock, but the onscreen control is at 3 o'clock. Mulligan does offer a Soft Takeover mode, to facilitate using pots, but it is faster and more intuitive to use encoders to adjust plugin parameters. Please see the Mulligan Manual's Choosing a MIDI Controller section for more details about those differences.
Because encoders work better than pots for plugin control, for this list we are only including controllers with encoders. This is not a comprehensive list, and it does not include any MIDI keyboard controllers (some of which include enough knobs and switches to be viable Mulligan controllers).
One caveat: many controllers with encoders still send Absolute data by default (they track the value of each knob internally, a trick that we call "fake absolute" knobs), and you must use the editor supplied by the manufacturer to change their encoders to send Relative data instead.
Model Manufacturer Number of Encoders Mappable Buttons Notes Twister Midi Fighter 16 16*
(push-encoders)4x4 grid of knobs (no separate buttons), customizable color coding Killamix Kenton 9 9 Joystick X-Touch Mini Behringer 8 16 Editor only runs on Windows (required for setting knobs to Relative) * Note that, for the count of Mappable Buttons, this chart generally does not include knobs that have a push-switch built into them. The one exception to this is the Twister, which has only push-encoders, so we have included them here.
- Can I use more than 8 knobs with Mulligan?
Not for plugin control. This is due to a technical limitation of the MIDI controller protocol that Mulligan uses (the M-Audio Keyboard type). That protocol was designed to support a hardware controller with an eight knob layout. So when controlling a plugin in Pro Tools, Mulligan can access eight parameters at a time, because that is the predetermined size of its parameter pages.
However, you can have many parameter pages in a plugin mapping, so with a thoughtful page layout you can organize a large number of parameters into functionally related "groups of eight" that are conducive to your workflow.
For example, in a channel strip plugin, you could organize the parameters by section, so you'd have one parameter page for the expander, another for the compressor, and several pages for different bands of the EQ section.
Another example would be a complex reverb with lots of tweakable controls. For that, you might want to organize parameter page #1 as a "macro" control page, with the parameters you would most commonly want to grab readily at hand (e.g. mix, decay time, predelay). Subsequent pages could then be grouped for more detailed work, like adjusting the diffusion characteristics or shaping the EQ.
If your MIDI device has more than eight knobs, you can still make good use of them with Mulligan. Eight of the knobs could be assigned as Plugin Knobs 1-8, and then the remaining knobs can be assigned to other duties. Mulligan includes commands for controlling level, pan, and sends for the Current Track, as well as commands for navigating through tracks (with Increment Track) and parameter pages (with Increment Page) by using knobs.
- I'm trying to make a custom plugin map in Pro Tools, but when I click on a plugin control, nothing happens. What do I do?
There is a known issue with certain plugin brands, where their code is missing a required linkage between the plugin GUI and the plugin parameter system. Fortunately, there are a couple workarounds for it, which will allow you to create custom plugin maps regardless:
- You can always use the Parameter Menu in the plugin window (the popup menu just to the left of the LEARN button) to select a parameter for mapping. The parameter menu defaults to reading “No Control”. After pressing the Learn button, select the parameter you’d like to map from the menu, and twist a knob. Then pick another parameter from the menu, and twist a knob. This works just like the click & twist mapping method, except you’re using the menu instead of clicking.

However, selecting the parameter from a menu is slower than just getting to click on it, and for some plugins with dozens (or even hundreds) of parameters, scrolling through that menu can be rather awkward. So, there is a second method, which can work, but again is dependent on the plugin manufacturer’s implementation, so it’s not guaranteed to work:
- After pressing the LEARN button, hold down the “3-finger salute” keyboard shortcut and click on an onscreen control, aka
Command-Option-Control-click. This may get the plugin to recognize that you’re clicking on a control, even if it ignores plain clicks with no keyboard modifiers. (The shortcut of justCommand-Control-clickmay also work for many plugins – so if the first one fails, try that one instead.)
- I mapped a knob, but now it either stutters in place, or jumps between minimum and maximum, when I try to turn it. What went wrong?
These behaviors indicate that an incorrect knob mode was set for that command. The knob mode detected by Mulligan must match the actual mode that your MIDI controller is using to send data from that knob.
Please repeat mapping the command in the Mapping Window, being sure to turn the knob slowly to the left so that Mulligan can detect the correct knob mode.
- Can Mulligan work alongside a HUI controller?
Yes! The HUI controller will need to be in Peripherals > MIDI Controllers slot #1 in order to function properly, and Mulligan can be in slot #2:
As noted in the FAQ Why isn’t the Learn button in the Pro Tools plugin window responding?, the plugin window Learn button won't be responsive unless Mulligan is in slot #1, so you won't be able to use the Learn button to edit your custom plugin mappings with a HUI controller in slot #1.
With the HUI device in slot #1, the HUI controller and Mulligan will share their track banking selection. You can see this visually in the Pro Tools session – the group of eight tracks under HUI control will be outlined in blue, with the currently selected plugin insert outlined in yellow (or occasionally in white, depending on Pro Tools' mood).
Using HUI and Mulligan together also has a great "side effect" – Mulligan will automatically change the current bank selection when you click on a track, or use Mulligan's Track Navigation buttons to select a new track. (A HUI controller by itself will NOT switch banks if you click on a track outside of the current bank, and instead the user must tediously use channel and/or bank buttons on the HUI controller to switch to a new bank.)
However, with Mulligan working in tandem with a HUI controller, clicking on any track will automatically jump the current bank selection so that it includes the new track, bringing that track into focus for the HUI device as well. Bonus!
This is a good place to mention that there's a Pro Tools preference to stop the Edit and/or Mix Windows from automatically scrolling their views to show the current bank. Look in Preferences > Mixing > Controllers. If you don't want Pro Tools to jump those windows around, uncheck those Follows Bank Selection options:

- When I select an Instrument track, why does it automatically record-arm it?
Unfortunately this is an automatic behavior from Pro Tools, which happens as soon as the M-Audio Keyboard protocol is engaged. This is not an action that is triggered by Mulligan itself. (Note that the automatic record-arm affects only Instrument and MIDI tracks, not audio tracks.)
Our best suggestion for a workaround is to put Instrument and MIDI tracks into Record Safe mode, by
Command-clickingthe Record button on each of your Instrument and MIDI tracks.(Optionally, you could also
Command-Option-clickthe Record button, to put all tracks into record safe mode. Or,Command-Option-Shift-click, to put all currently selected tracks into record safe mode.)Record safe mode only stops MIDI data (or audio, if engaged on an audio track) from being recorded to the track. It does not stop automation from being recorded, which is great for Mulligan since you can still capture your controller moves via automation while in record safe mode.
- Why do I need Mulligan? Can’t Pro Tools already connect to hardware controllers?
While Pro Tools does provide some built-in access to hardware controllers, through MIDI or Eucon, there is no other solution that offers optimum plugin control like Mulligan does. At a price point that’s a fraction of the cost of other available options, Mulligan provides the best plugin control experience available for Pro Tools today.
Let’s take a look at the other plugin controller options available, and see how they pale in comparison to Mulligan.
The venerable HUI MIDI protocol works reasonably well for mixer control in Pro Tools, but for plugin control it can access at best 4 parameters per page. And some plugins don’t expose their full set of parameters to HUI, so you can have missing parameters that just aren’t accessible through HUI. Also, HUI doesn’t allow you to re-order a plugin’s parameters, so you’re stuck with whatever default parameter order and page groupings the plugin maker has set.
Parameter name display is also severely limited with HUI. Even on a controller with built-in display screens for paramter names, HUI will only send a 4-character long parameter name! So you’re left deciphering parameter names like “Attk” and “Rels” (not so bad), or “LtLv” and “A-01” (essentially useless).
Eucon controllers like the Avid S1 ($1500) or Avid Dock ($1200) offer far better hardware plugin control than HUI. Like Mulligan, they allow for 8 parameters per page. And Avid eventually added support for custom parameter layouts, like Mulligan – although unlike Mulligan, there is no facility provided to easily switch between multiple custom layouts. However, their displays are still limited to 8-character long parameter names. Sometimes that’s sufficient, but would you have guessed that "RtrSH/DB” stands for “Rotary Speaker Horn/Drum Balance”?
Unlike these MIDI or Eucon solutions, Mulligan’s innovative Heads-Up Display (HUD) shows you 8 parameter names with up to 40 characters each, right where you need them. The HUD appears as an overlay window at the bottom of your main screen, where your vision is already focused while mixing.
Parameter display names are fully customizable in the HUD. For example, if you wanted to shorten the somewhat verbose “Rotary Speaker Horn/Drum Balance” to just “Horn/Drum Balance”, it’s a simple matter to click on the name in the HUD and edit the text. The new display name is then saved going forward.
Perhaps the biggest advantage of using Mulligan is that it allows you to work with any plain MIDI controller on the market. No specialized hardware is needed. If you buy an Avid controller and you don’t like the physical feel or the layout of the knobs, there’s no way to modify that, and you’re stuck with them. But with Mulligan, you have the freedom to choose whatever MIDI hardware fits your hands – and your budget – the best.
FAQ for Mulligan 1
Don't Forget //
© 2026 reFuse Software, LLC /// ///