

Introduction
Thank you for purchasing the Lowender plug-in, a subharmonic synthesizer reminiscent of classic analog dual-band bass enhancer circuits.
More than a simple EQ, the Lowender creates new bass content from your existing audio material. From post-production houses to disco floors, from high-powered live sound to rock, dub, and metal studio productions, the characteristic rumble of the subharmonic synthesizer has been an engineer's best-kept secret for years. Now, finally, you can get those low lows from within your favorite DAW application!
While taking the classic "Boom Box" sound as its core, the Lowender expands on the concept in several ways. First, it offers switchable frequency ranges, so that the low end frequencies generated can be selected to fit the program material.
Second, the generated subharmonics pass through a gate tailored for low frequencies, which is useful for cleaning up unwanted bass rumble (e.g. from between kick drum hits in a drum loop).
Third, the Lowender passes the bass material through an output section comprised of an overdrive circuit and a lowpass filter. Driving or compressing the newly generated low frequencies is essential for evening out their dynamics, and will allow them to sit well in a mix. The variable lowpass filter is provided to shave off the higher harmonics of the overdrive and create a smooth low end - or you can leave some of them in, for raspier bass sounds.
Installation
Run the Installer
On Windows systems, you can choose to install the AAX or VST3 versions. The install locations are as follows:
| Format | Location |
|---|---|
| AAX | C:\Program Files\Common Files\Avid\Audio\Plug-Ins |
| VST3 | C:\Program Files\Common Files\VST3 |
On Mac systems, you can choose to install the AAX, VST3, or Audio Unit versions. The install locations are as follows:
| Format | Location |
|---|---|
| AAX | /Library/Application Support/Avid/Audio/Plug-Ins |
| VST3 | /Library/Audio/Plug-Ins/VST3 |
| Audio Unit | /Library/Audio/Plug-Ins/Components |
Authorize Your Copy
Please see the Utility Bar section for an explanation of how to authorize your copy.
Using Lowender
For any of the sliders or knobs, you may Command-drag (Mac) / Ctrl-drag (Win) to access fine resolution control.
The Lowender's controls will be explained in order of the signal flow from input to output:
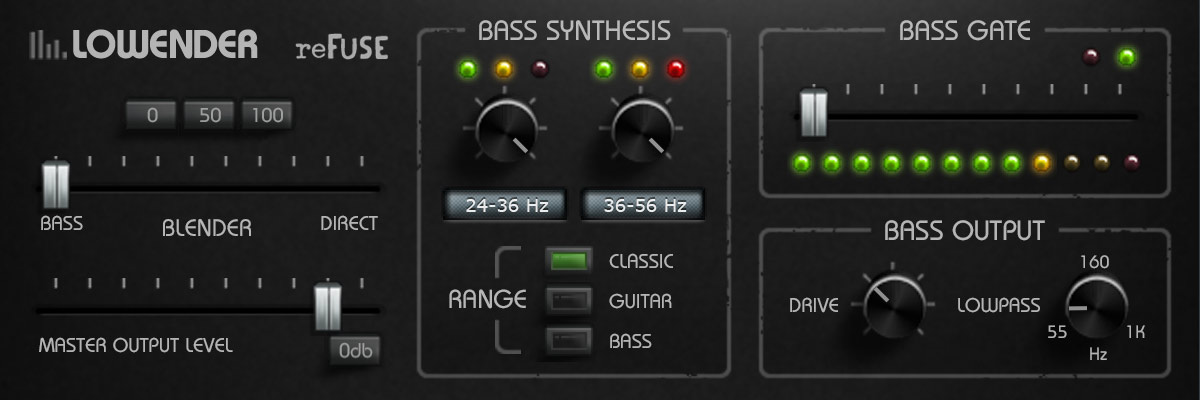
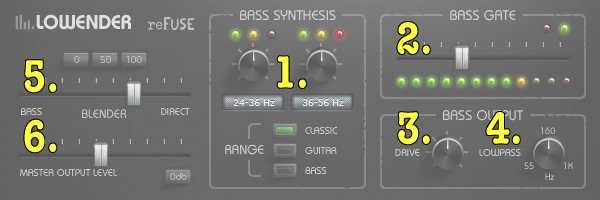
1. Bass Synthesis Controls
The Range control allows you to select from three frequency ranges of subharmonic synthesis: Classic, Guitar, and Bass. The "Classic" frequency range is the range used by traditional subharmonic synthesizer hardware boxes (24-56 Hz, split into two bands at 36Hz). The Guitar and Bass settings target the lowest octaves of guitar and bass respectively.
To put this in terms of musical notes, with the Classic setting, the bass synthesis would affect only up to around a low A on guitar. With the Guitar setting, the synthesis affects roughly up to the low D# (fourth string, first fret) on standard guitar tuning (and likewise, the low D# on bass for the Bass setting).
The knobs each control the level of one band of the synthesized bass signal.
New in Lowender version 1.5, there is now an automatic phase reset of the two subharmonic bands, triggered when the noise gate closes. This aids in getting consistent subharmonic levels, especially when using sampled drum hits.
2. Noise Gate Threshold
After the two bands of added subharmonics are mixed together, the combined bass signal passes through a noise gate. The attack/release controls of the gate have been optimized for the low frequency signals they are required to handle, so you just have to set the threshold. The gate can be helpful to just grab the strongest notes (say, from a kick drum), while gating out what would otherwise sound like background rumble. Setting it all the way to the left bypasses the gate.
The green LED in the top right lights when the gate opens; the red LED indicates that the gate is closed.
3. Bass Drive
Following the noise gate, the bass signal is fed into a drive/saturation circuit. Sometimes those clean subbass signals just don't cut it, and a little squashing is in order. Have fun, we gave you a lot of rope here!
4. Lowpass
Finally, after the drive circuit, the bass signal is fed to a lowpass filter with a cutoff frequency ranging from 55 Hz to 1 kHz. For the smoothest bass, leave it all the way down - this will shave off any fuzz added by the drive. If you want the lower mids to show a little fuzz, raise the filter's cutoff point.
5. Bass/Direct Blender
The Blender slider works differently than you might expect. In the center position (50%), you get the full level of both bass and direct signals. As you move the slider left of center, the direct signal gets quieter, but the bass signal does NOT get louder, as it's already at full volume in the center position.
Likewise, as you move the slider right of center, the bass signal drops in level, but the direct signal remains constant. This allows you to try sneaking in just a touch of subharmonic, by moving the slider all the way right, and then slowly (remember the Command-drag (Mac) / Ctrl-drag (Win) keyboard modifiers for fine resolution) nudging it to the left to add in a little bass signal.
There are three preset buttons provided for 0%, 50%, and 100% blends.
6. Master Output
The Master Output level is set at unity (0 dB) by default. You can return to this setting at any time with the "0 dB" preset button.
Metering
The Lowender features mini LED meters (right above the Bass Synthesis level knobs) to show bass synthesis activity in the two frequency ranges. In the signal chain, these meters come right after the synthesis knobs, but before the gate or drive.
On Monitoring
Please note that the signals generated by the Lowender range from roughly 20 - 60 Hz. This means that you won't hear the subharmonic content if you're monitoring on smaller speakers. Please be sure to try out the Lowender using appropriate monitoring! Even a good pair of headphones can provide better extended bass range than typical nearfield monitors.
Utility Bar
Along the bottom of the plug-in window you will find the Utility Bar. This is where license management tools and other helpful (but non-audio related) functions reside.
License Management
Depending on whether or not Lowender has been authorized, the license management area in the bottom left of the Utility Bar will have different displays.
In Demo Mode
The display will read Demo Unlock, and mousing over it will change it to a Load License File button. In demo mode:
- Lowender’s settings will not be saved when you close a project file.
- The DAW’s preset menu will only save or load the default settings.
- Lowender's own Export and Load buttons are disabled.
- Every 45 seconds, audio will drop out for several seconds and a burst of noise will be heard.
To authorize Lowender
- Log in to your reFuse Software user account, and use the Download License File button to save the license file to your desktop.
- Use the Load License File button to select the Lowender_license_file.xml from your desktop.
- A message will appear that Lowender is now authorized. At this point, Lowender has saved the licensing data and cleared the license file from the desktop.
In Authorized Mode
The bottom left of the Utility Bar will display your registered username. Mousing over it will change it to a Clear Authorization button. If you click this, a confirmation window will appear, asking if you want to clear the authorization for Lowender off the system.
Preset Menu
This menu loads from a set of Factory Presets designed to give an overview of Lowender's range of sounds.
When a preset has just been loaded, its name will be highlighted in yellow in the Preset Menu's display. Once any of the controls have been changed from the preset's settings, however, the name will no longer be highlighted.
Note that this menu does not load or display any user-saved presets.
Export & Load
The Export and Load buttons allow saving presets as files to disk. The format is a human-readable XML file, making it completely cross-platform. This allows interchange of presets between any DAWs or systems.
View Docs
This button opens the Lowender User Guide in your default web browser.
Check for Updates
This button will check with our server to see if you have the most recent update of Lowender. It does not launch a web browser to do this, the check is done right in the plug-in.
Keyboard Shortcuts
A number of keyboard shortcuts are available, when Lowender is the frontmost window:
- Standard copy paste shortcuts (
Command-C,Command-V) will copy/paste the current preset as XML data. A(no modifier key) opens the "Load License File" dialog as a native window, for improving accessibility by allowing interaction with screen reader software.I(no modifier key) copies diagnostic info to clipboard, for pasting into support requests.
Presets
Basic
A good starting point, using the Classic range, with a 50/50 blend and just a touch of drive.
Drum Loop
Add some subtle subs to your drum loop of choice. The gate is set to pass only the subharmonics of the kick drum through, and block any subharmonics being generated by the snare or other sounds in the loop. Adjust the gate control so that it's only opening on the kick drum hits.
Kick Only
Want to pull out just the kick hits from a drum loop? This uses the same gating as the Drum Loop preset, but the blender is set for subharmonic signal only. The drive is cranked up, and the lowpass filter opened up to let the kick hits growl a bit.
Smooth Kick
Like the Kick Only preset, but the Lowpass filter is all the way down, to keep it smooth. In addition, only the higher band of subharmonics is used, eliminating the funky rumble that occurs when two bands of subharmonics beat against each other.
Guitar
The Guitar range is employed here to add some bass reinforcement to a guitar signal. The Lowender will "grab" notes from the low E to approximately the D# above that.
Bass
The low E string on a bass has a fundamental frequency of 41 Hz. The lowest note the human ear can hear is around 20 Hz. If you stay up nights worrying about how to fill that 20 - 40 Hz gap, this preset is for you! The Lowender's Bass range takes it all the way down, to the lowest of the lows.
Splatty
Obnoxious sounds result from cranking up the drive, opening up the lowpass filter all the way, and setting the blender for all bass.
Thunder LFE
The subwoofer special. This preset is optimized for post-production rather than music. The lowpass filter on the output has been set at 80 Hz, in accordance with Dolby's recommendations for the LFE channel of 5.1 mixes.
